Getting warm in spite of the odds!
One of the 'luxury' mods that I've been planning for the Ibex since day one, is a self-powered auxiliary heater. Not an inexpensive item, and one that needed to be chosen with some thought. There are two main manufacturers (there are several others but these are the 'names' in the market IMHO).
- Eberspacher
- Webasto
Each has good products, and it's hard to find any 'points' to score one against the other. Each is also equally bad at publicity and finding out any firm information, past the marketing 'it's great' stuff, is difficult. I think they are letting themselves down badly here, in the 4x4 market I'm sure that many more people would buy if they were better advertised.
There are two kinds of auxiliary heater to choose from, each having good and bad points.
| Type | Pros | Cons |
|---|---|---|
| Aux Air Heater | can warm cab while driving | doesn't warm engine |
| Aux Water Heater | Cannot add extra heat while driving | warms engine as well as cabin |
These are certainly not the only decision points, but are the biggest drivers in my choice, which was a Webasto ThermoTop C auxiliary Water heater. I decided that while extra cab heat would be nice, the prime usefulness was to have demisted/defrosted glass as soon as possible, and that a warmed engine would be good for long life.
When the parcel arrived the first thought is 'OMG, where does all that fit?'. There is a lot of parts to the kit, and it certainly doesn't look like a one day job to make a nice fitment. Fitting is further complicated because although the Ibex uses Land Rover running gear, it doesn't have LR bodywork, so the supplied instructions and 'LR fitting kit' will be amended as required. (In fact the fitting kit supplied was for a Td5 powered vehicle anyway, not 300Tdi).
A small timer module is included to control the heater, though I intend to use the a spare remote control output from the alarm system to provide a more 'ad-hoc' control, if this is possible. Webasto sell a remote control kit, but I couldn't see the point in having yet another keyfob to carry around. Sadly Webasto don't provide a great deal of information on the 'Telestart' remote control kit unless you purchase the option, so it wasn't possible to plan the remote control until I had my hands on the main heater and timer to investigate.
And so we proceed to install......
The heater arrived (supplied by Branchflowers) complete with the generic Webasto installation manual and a set of Land Rover specific instructions, which appeared very good though they referred to a TD5 vehicle. Istallation appeared very daunting at first, with a lot of connections to make, and restrictions on placement of many parts.
After a few re-readings of the installation manuals, over a relaxing drink or two, it all began to make sense and I had a mental plan of the installation sequence. I set myself a target to install the unit in one day, at least to a point where the unit was installed, if not commisioned and operating. In practice, it took about 11 hours to complete, including running up the heater for the first time.
Ibex inner wings are a different shape to Defender ones, and the wheel arch is much larger, so the unit was installed horizontally on the top of the inner wing. This works very well, with the water connections, and fuel and air intakes positioned at the rear of the unit. The exhaust exits horizontally, curving down alongside the shock tower, which has the silencer mounted at its base, finally ending just behind the steering damper, pointing downwards.
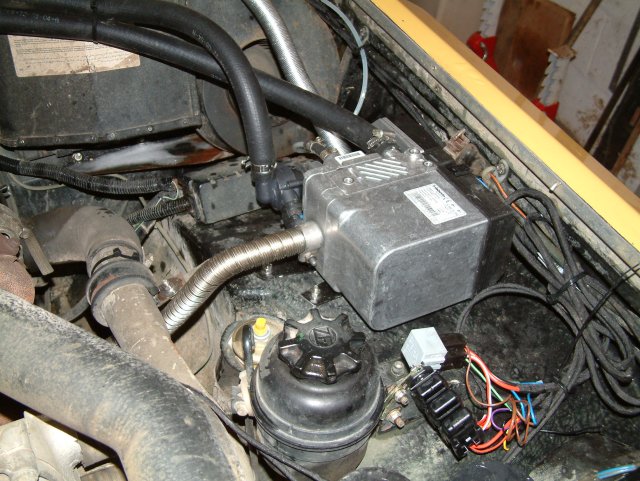
Connecting the water inlet and outlet was easy with the supplied fittings. The heater sits in the flow between the cylinder head and cabin heater, so one cut in the original pipework is all that is required, all the additional pipework necessary is included in the Webasto kit.
Electrical connection to the unit was extremely simple, as a prewired harness is supplied by Webasto. This is a fair bit too long for a LR install, but most of it can be easily shortened to suit. I chose to leave the main part as supplied and bundle the surplus, as it is a really nicely made loom. There is a single power and ground feed (note the instructions are not clear about the ground wire but it is easy to figure out), 3 fuseholders and a relay, then indicidual connections to fuel pump, timer, heater and fan. The fan circuit has power switched to it when required, to ensure it runs even with the ignition off.
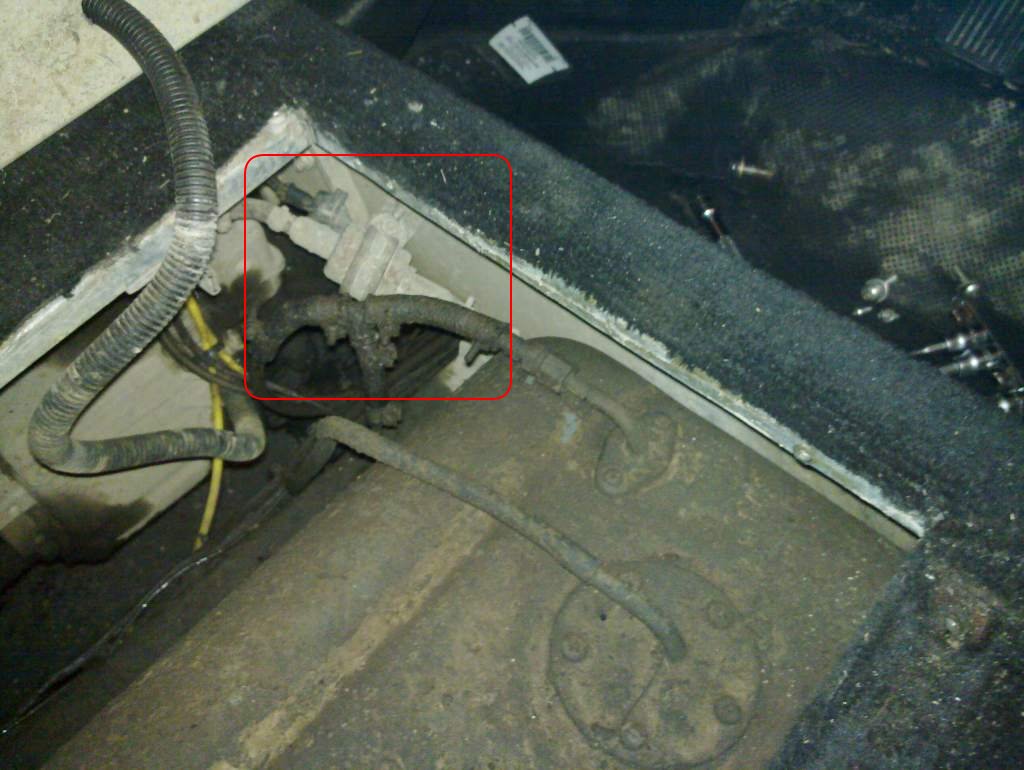
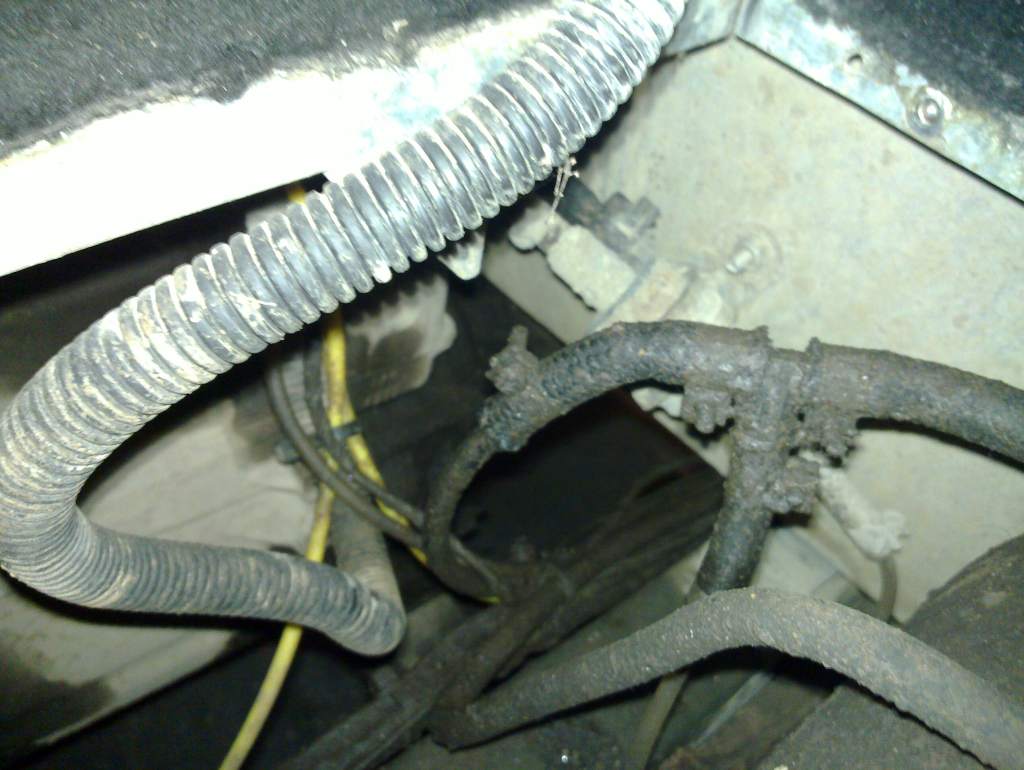
The fuel pump took some time to install, but only because it is fiddly working in the restricted space around the fuel tank, with the drivers seat removed. There is a Tee adapter which is cut into the diesel spill pipe (fuel return to the tank from the injectors). The Webasto instruction contain lots of good advice on orientation of the various parts to ensure any air bubbles are returned to the tank and do not cause problems. The supplied pump is small and appears well engineered, and it acts as a dosing unit, providing the required flow of diesel.
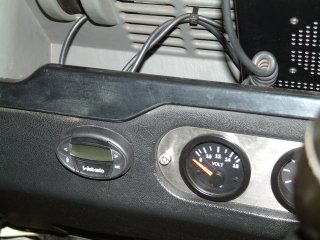
The timer module is small and neat, and is easily installed, with the supplied template to drill the mounting holes. In addition there is an optional 'summer/winter' switch so the timer can be used in hot weather to ventilate the interior, instead of heating it. I didn't install this switch, but only because it wasn't 'deep' enough to fit the LR dashboard. I may retrofit it when I find a more suitable place for installation.
With all that done, it remained only to try it out. With some trepidation I pushed the 'heat' button and things started to happen. The first two attempts there was no diesel in the lines and the Webasto seemed to go through a startup cycle, then shut down with a cooldown sequence, blowing air through the exhaust. On the third attempt, after a couple of moments delay the exhaust started to get hot, and shortly afterwards the water outlet warm noticeably warmer than the inlet.
Flushed with success, and having other commitments I shut down and decided to leave full testing for another day. When I returned to the front of the truck I was greeted by a cloud of diesel smoke, which caused a few nervous moments until I had checked that nothing was amiss.
Next day, at work, I fired up the unit for a 30 minute run in my lunch break. While the engine was not completely cold, having run only 3 hours previously though it was a fairly cold day. Within 5 minutes of lighting up, there was warm air coming from the heater vents, sufficient I would think to defrost a windscreen. In 20 minutes, the top of the engine was hot to touch, and the cabin was warm throughout. The 30 minute 'standard' setting seems likely to be adequate for most weather conditions in the UK except the very coldest days.
As yet I have had no need to use the heater 'in anger' but so far I'm very impressed with it. The unit seems well built, and the kit contains all the necessary parts, in useful sizes, and all of the highest quality. The timer setup supplied as standard is useful and fairly easy to operate, though if I did not have an obvious route to remote control, I would spend the extra cash and buy the Webasto 'Telestart' kit. It certainly will enhance comfort and safety in the winter months, with defrosted windscreen and warm cabin. An expensive add-on, but one which I feel is certainly worth the cost, particularly in a Land Rover.
Branchflowers price was very competitive, and I found them to be very helpful. They also didn't try to bullsh!t me when the unit didn't arrive on time! In an ideal world you might expect the truth from any company, sadly far too often it isn't the case in my experience.
Update : Tried and Tested
Last night, I had the first opportunity to try out the heater properly. Firstly, when I left work for the evening at around 8.30pm, there was a frost, and several people in the car park were to be seen shivering as they scraped their glass clear. Secondly I was transporting some expensive and rather delicate equipment, and I didn't want to subject it to condensation due to the transfer from warm office to cold soft-top vehicle. Having had the foresight to nip out and turn on the heater at 8pm, I was able to load the equipment into a warm dry vehicle, and drive out with perfectly clear windows. I have a feeling that one winter will be more than enough to justify my expenditure on this little 'luxury' :-)
Questions and Answers - some questions I've been asked about the install...
I understand that that removing the centre console to get to the fan controls is a bit fiddly ? (300TDi Disco)
Removing the dash is likely not easy (my only disco was 200 so no experience), however, the fan motor probably has it's own fuse, so you could hook the fan control in at the fuse panel pretty easily.
What about the radio rx unit, looking at the length of the rf cable I would guess it needs to be mounted under the dash somewhere in order to get the stick-on antenna to the top of the windscreen ?
I don't have the Telestart (will be hooking into my alarm remote instead) but don't put the antenna on the windscreen if you have a heated screen. The metal plating film in the glass used for the heating will reduce the available range of the remote control.
Any hints or advice on good locations to fit the dosing pump, presumably somewhere in the engine bay is okay?
Likewise, what about where to tap the fuel feed T piece into, the Webasto manual mentions using the return line, is that easy to get to and how do you ensure max angles quoted are not exceeded (clamp the T piece somehow) ?
The dosing pump really wants to be fitted near the tank, from the install manual. It ought to be possible to get it high on the chassis rail near the tank. I clamped the hoses in place to get the angles (mine is underseat tank). The angles are mainly to ensure any air bubbles get returned to the tank.
Would it have been possible to tap into the fuel spill within the engine bay or is there some reason you went back to the tank?
I could have fitted it in the engine bay, because I have an underseat tank, but it might have been a bit high. All the restrictions about installing near the tank and the installed height are to do with the pumps ability to draw diesel. It's a push pump driving into a very small pipe, and pumps are generally only good at push OR sucking, not both.
Did you have any problems bleeding the unit once it was installed ?
Get some decent quality hose clamps for the water pipes, and install them as close as possible to where you cut the pipe. (About 5" apart is good). Then you can install the 'head side' pipe, and fill the heater with water via the other pipe, with a funnel, before joining it to the heater side.
Before you start make sure you can undo the bleed bung! They are notorious for siezing in place. Use the correct size ring spanner or socket, otherwise you will bu66er it! Check out this page before you install.
Technical information ( operation / installation / service ) is available from here Fellow UK-LRO lister Colin Reed has a good page on installing an Eberspacher on his website here